728x90
반응형

🙆♂️ 일반 셀 클래스 작성
저번 게시물의 링 네트워크를 구성했던 것에서 유연한 변수를 사용하고 캡슐화를 사용하여 확장된 기능을 제공하는 링 네트워를 구성해보겠습니다.
from neuron import h, gui
from neuron.units import ms, mV
h.load_file('stdrun.hoc')
사전 참조를 해주고
class Cell:
    def __init__(self, gid, x, y, z, theta):
        self._gid = gid
        self._setup_morphology()
        self.all = self.soma.wholetree()
        self._setup_biophysics()
        self.x = self.y = self.z = 0
        h.define_shape()
        self._rotate_z(theta)
        self._set_position(x, y, z)

        # everything below here in this method is NEW
        self._spike_detector = h.NetCon(self.soma(0.5)._ref_v, None, sec=self.soma)
        self.spike_times = h.Vector()
        self._spike_detector.record(self.spike_times)

        self._ncs = []

        self.soma_v = h.Vector().record(self.soma(0.5)._ref_v)


    def __repr__(self):
        return '{}[{}]'.format(self.name, self._gid)

    def _set_position(self, x, y, z):
        for sec in self.all:
            for i in range(sec.n3d()):
                sec.pt3dchange(i,
                               x - self.x + sec.x3d(i),
                               y - self.y + sec.y3d(i),
                               z - self.z + sec.z3d(i),
                              sec.diam3d(i))
        self.x, self.y, self.z = x, y, z

    def _rotate_z(self, theta):
        """Rotate the cell about the Z axis."""
        for sec in self.all:
            for i in range(sec.n3d()):
                x = sec.x3d(i)
                y = sec.y3d(i)
                c = h.cos(theta)
                s = h.sin(theta)
                xprime = x * c - y * s
                yprime = x * s + y * c
                sec.pt3dchange(i, xprime, yprime, sec.z3d(i), sec.diam3d(i))
일반 셀 생성에 대한 코드입니다. gid와 x,y,z,축값, 세타 값을 입력받습니다.
record 변수도 들어가 있는 모습입니다.
class BallAndStick(Cell):
    name = 'BallAndStick'

    def _setup_morphology(self):
        self.soma = h.Section(name='soma', cell=self)
        self.dend = h.Section(name='dend', cell=self)
        self.dend.connect(self.soma)
        self.soma.L = self.soma.diam = 12.6157
        self.dend.L = 200
        self.dend.diam = 1

    def _setup_biophysics(self):
        for sec in self.all:
            sec.Ra = 100    # Axial resistance in Ohm * cm
            sec.cm = 1      # Membrane capacitance in micro Farads / cm^2
        self.soma.insert('hh')
        for seg in self.soma:
            seg.hh.gnabar = 0.12  # Sodium conductance in S/cm2
            seg.hh.gkbar = 0.036  # Potassium conductance in S/cm2
            seg.hh.gl = 0.0003    # Leak conductance in S/cm2
            seg.hh.el = -54.3     # Reversal potential in mV
        # Insert passive current in the dendrite
        self.dend.insert('pas')
        for seg in self.dend:
            seg.pas.g = 0.001  # Passive conductance in S/cm2
            seg.pas.e = -65    # Leak reversal potential mV

        # NEW: the synapse
        self.syn = h.ExpSyn(self.dend(0.5))
        self.syn.tau = 2
BallAndStick에 대한 코드부분입니다. 생성된 셀의 세부 값들을 조정해주고 soma와 dend를 연결시켜주는 부분입니다.
그리고 캡슐화를 사용해서 여러 링 네트워크들을 연결하여 시뮬레이션을 편리하게 하도록 합니다.
class Ring:
    def __init__(self, N=5, stim_w=0.04, stim_t=9, stim_delay=1, syn_w=0.01, syn_delay=5, r=50):
        """
        :param N: Number of cells.
        :param stim_w: Weight of the stimulus
        :param stim_t: time of the stimulus (in ms)
        :param stim_delay: delay of the stimulus (in ms)
        :param syn_w: Synaptic weight
        :param syn_delay: Delay of the synapse
        :param r: radius of the network
        """
        self._syn_w = syn_w
        self._syn_delay = syn_delay
        self._create_cells(N, r)
        self._connect_cells()
        # add stimulus
        self._netstim = h.NetStim()
        self._netstim.number = 1
        self._netstim.start = stim_t
        self._nc = h.NetCon(self._netstim, self.cells[0].syn)
        self._nc.delay = stim_delay
        self._nc.weight[0] = stim_w

    def _create_cells(self, N, r):
        self.cells = []
        for i in range(N):
            theta = i * 2 * h.PI / N
            self.cells.append(BallAndStick(i, h.cos(theta) * r, h.sin(theta) * r, 0, theta))

    def _connect_cells(self):
        for source, target in zip(self.cells, self.cells[1:] + [self.cells[0]]):
            nc = h.NetCon(source.soma(0.5)._ref_v, target.syn, sec=source.soma)
            nc.weight[0] = self._syn_w
            nc.delay = self._syn_delay
            source._ncs.append(nc)
🙋♂️ 생성 및 시뮬레이션
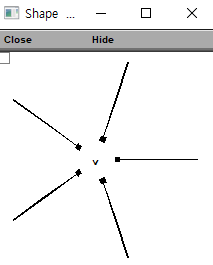
ring = Ring(N=5)셀 5개가 연결된 링 네트워크를 생성합니다.
shape_window = h.PlotShape(True)
shape_window.show(0)
이 코드로 잘 구성되었는지 확인할 수 있습니다.

잘 나옵니다.
t = h.Vector().record(h._ref_t)
h.finitialize(-65)
h.continuerun(100)
시뮬레이션을 기록할 수 있도록 설정하고
%matplotlib inline주피터 노트북 환경이라면 작성을 해주고
import matplotlib.pyplot as plt
plt.plot(t, ring.cells[0].soma_v)
plt.show()
cell[0]의 시뮬레이션 결과를 나타냅니다.

plt.figure()
for i, cell in enumerate(ring.cells):
    plt.vlines(cell.spike_times, i + 0.5, i + 1.5)
plt.show()
이러면 래스터 표로 확인할 수 있습니다.
plt.figure()
for syn_w, color in [(0.01, 'black'), (0.005, 'red')]:
    ring = Ring(N=5, syn_w=syn_w)
    h.finitialize(-65 * mV)
    h.continuerun(100 * ms)
    for i, cell in enumerate(ring.cells):
        plt.vlines(cell.spike_times, i + 0.5, i + 1.5, color=color)

plt.show()
그래서 이렇게 다른 값을 수정하여 비교해볼 수도 있습니다.
728x90
반응형
'AI > neuron' 카테고리의 다른 글
| [neuron][파이썬] 21. 깃헙 뉴런 튜토리얼 - Ball and Stick model (0) | 2022.07.27 |
|---|---|
| [neuron][파이썬] 21. 깃헙 뉴런 튜토리얼 - Single compartment neuron model (0) | 2022.07.27 |
| [neuron][파이썬] 17. 링 네트워크 시뮬레이션 실행 및 출력 (0) | 2022.07.22 |
| [neuron][파이썬] 16. 링 네트워크 구성을 위한 초기 구성 - Initial configuration for build a ring network (0) | 2022.07.22 |
| [neuron][파이썬] 15. 여러 개 시뮬레이션2 - Run the simulations (0) | 2022.07.22 |